28 Dec 2015
A yeast starter is used to initiate cell activity or increase the cell count before using it to make your beer. The yeast will grow in this smaller volume, usually for 1-2 days, which then can be added to 5 gallons of wort.
Time Required: 30 minutes
Items Required
- Water
- Ice
- Small sauce pot
- funnel
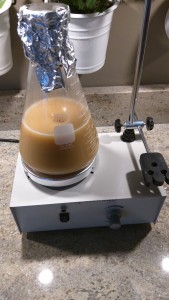
- 1000 mL Erlenmeyer flask (pyrex)
- Aluminum foil
- Dry Maly Extract (DME)
- Stir Plate / Stir Bar
- Scissors
- Thermometer
- Star San
- Yeast
- Yeast Nutrient
Making A Starter
- If using liquid yeast as a source, activate the inner yeast pouch and allow to incubate
- Bring 650mL of water to a boil
- Remove water from heat
- Add 1/2 cup of DME, stir to mix, keep off heat to prevent scorching
- Return mixture to heat and gently boil for 15 minutes
- Sanitize the flask, scissors, thermometer, funnel, and stir bar
- When the mixture has finished boiling, use the funnel to transfer it to the flask
- Prepare an ice bath and place the flask into the bath, reduce the temperature of the mixture to 85 degrees (Fahrenheit)
- Add the stir bar, yeast, and 1/4 tsp of nutrient to the mixture and cover the mouth of the flask with the aluminum foil
- Place on the stir plate and allow to stir for 24 hours
To pitch the starter into a batch of beer remember to swirl the flask to pick up all the sediment, also use a magnet to hold the stir bar at the bottom of the flask to prevent it from falling into the fermentor.
10 Sep 2014
I recently bought a fancy thermostat (more on that later) and I wanted to be able to have the thermostat automatically go into ‘away’ mode when I set the house alarm as AWAY. So I looked and I didn’t see any api available for my SimpliSafe security system. I did however stumble upon this article where the author reverse engineered the REST protocol from the phone app. So I’ve taken his specification and implemented it in Java
Get the source or jar.
The usage of the library is pretty simple. First just create a client
SimplisafeClient c = new SimpliSafeClientFactory().create("username", "password");
Then you can iterate through all of the base stations in your account
for(Location l: c.getLocations()) {
   System.out.println(l.getId() + "  " + l.getStreet1() + "  " + l.getSystemState());
}
and you can set the alarm state for any location
c.setAlarmState(l, SYSTEM_STATE.AWAY);
04 Sep 2014
Was doing something with the android API last night and noticed a strange method when auto-completing with eclipse.
UserManager.isUserAGoat()
A quick trip up the the git repo reveals that their goat detection algorithm, while unsophisticated, likely has a surprising high level of accuracy.
/**
     * Used to determine whether the user making this call is subject to
     * teleportations.
     * @return whether the user making this call is a goat
     */
     public boolean isUserAGoat() {
         return false;
     }
I wonder, what other detection algorithms are planned in the next major release?
04 Sep 2014
This is a discussion that I have had frequently, mostly with programmers that are transitioning from C/C++ where they are forced to consider how they want to pass values in and out of methods. In Java since you have no choice in the matter it is best to just let it go and rededicate that portion of your brain to a more productive task (like memorizing movie quotes or something).
For those that really want to know, Java is pass by value .. always.
First for anybody that isn’t familiar with the terms:
Pass By Reference
Passing parameters by reference means that the pointer nesting of parameters is deeper than the pointer nesting of local variables. If you have a variable with the type of a class, the variable is a pointer to the actual value.
Pass By Value
Pass by value means you are making a copy in memory of the actual parameter’s value that is passed in, a copy of the contents of the actual parameter.
I believe the key point of confusion is that Java never provides direct access to the values of objects themselves, in any circumstances. The only access to objects is through a reference to that object. But wait isn’t that the opposite of what you just said?No, of course not, Java objects are always accessed through a reference, rather than directly, it is commonplace to refer to fields, variables, and method arguments as being objects, when technically they are actually references to objects. However when those references get passed through a method call you are actually passing a copy of the value of the reference, this means that inside the method call if the variable were to get reassigned that the original object would not be affected.
Let’s look at a simple example:
private void foo(Object bar) {
    bar = "Override Value";
}

public static void main(String[] args) {
    String baz = "Original Value";
    foo(baz);
    System.out.println(baz);
}
Since Java is pass by value, when calling the method foo the reference to baz is copied and passed as a value. This is why internal to the method foo, reassigning the variable has no effect once the scope has changed back to main
As a consequence of not being about to reassign object references that are passed by value, Java lacks out parameters that are found in languages like ADA and C#.
09 Apr 2014
So I build a lot of projects for fun at home, and I have for a long time wanted to stand up lots of little machines (jenkins, nexus, test machines, etc…) to help me with the development of those projects. I am at home, and I am not interested in running an entire server farm (my house is warm enough thank you); of course virtualization is the answer!
- VMWare: I know that they now have a free version of ESXi, but I want to be able to manage the cluster from the browser and they are still charging for vSphere (or vCenter I can’t remember which is which)
- VirtualBox: I love VirtualBox; it is easy to use and they have an api and several projects have made web interfaces for controlling it, however it doesn’t have the room for expansion. Each installation is kinda tied to the host and it is a pain to move around
- KVM/QEMU/libVirt: The heart of linux virtualization. Works amazing, pain to setup/manage.
- oVirt: Looked very promising, by building on top of the qemu solution, but adding some fancy management via a web interface. With the release of 3.4 I thought it might finally be time to give this a whirl.
I grabbed an old i3 machine that I had laying around, booted it into the BIOS and made sure the VT-x extensions were enabled. First I wanted to install the latest Fedora 20, following the oVirt documentation I discovered (the hard way) that not all of the dependencies for oVirt are in the F20 repository.
So I backed down to F19….The yum install of ovirt rpms went fine, but the setup scripts kept dying and it just wouldn’t initialize the VDSM services.
CentOS 6.5 – Winner! Everything worked! … eventually. Below are the annotated steps that I followed.
*Note – Several steps in this installation require FQDNs so I went ahead and created two static IPs in DNSMasq one for the hardware MAC on the host machine and one for a random virtual MAC address for the engine VM that will get assigned in the installer.
######################### On Host Machine #################
Install the oVirt yum repository
sudo yum localinstall -y http://ovirt.org/releases/ovirt-release.noarch.rpm
sudo yum localinstall -y http://ftp.osuosl.org/pub/fedora-epel/6/i386/epel-release-6-8.noarch.rpm
sudo yum install -y ovirt-hosted-engine-setup screen
Create some folders on the host machine that will be used as NFS exports
mkdir /home/vmdrives
chown -R 36:36 /home/vmdrives

mkdir /home/vmdata
chown -R 36:36 /home/vmdata
Since we are going to run the engine as a VM inside the cluster we need to download a min installer for CentOS.
mkdir /home/tmp && cd /home/tmp
curl -O http://mirrors.kernel.org/centos/6.5/isos/x86_64/CentOS-6.5-x86_64-minimal.iso
chown -R 36:36 /home/tmp
Edit /etc/exports; add the following lines to enable the NFS shares
/home/tmp             *(rw,async,no_wdelay,no_root_squash,insecure_locks)
/home/vmdrives        *(rw,async,no_wdelay,no_root_squash,insecure_locks)
/home/vmdata          *(rw,async,no_wdelay,no_root_squash,insecure_locks)
Enable the NFS services for the host machine
sudo service rpcbind start && sudo chkconfig rpcbind on
sudo service nfslock start && sudo chkconfig nfslock on
sudo service nfs start && sudo chkconfig nfs on
Confirm that the NFS mounts actually show up in the RPC service
showmount -e localhost
Enable X11 Forwarding
You are going to have to export some VNC displays so you will need to make sure your host can export X11 displays over SSH.
sudo yum install xauth
sudo vi /etc/ssh/sshd_config
Make sure these settings are set in /etc/ssh/sshd_config
X11Forwarding yes
	X11UseLocalhost no
Restart SSHD
sudo /etc/init.d/sshd reload
Actually install the host, you can accept the defaults for most of the steps, just make sure your NFS shares get entered properly
screen
hosted-engine --deploy
If this all goes well it will give you directions on-screen for how to remote in and export the VNC display to the console for installing the hosted engine VM.
Install the VM and continue, it will reboot the VM and give you another VNC terminal for getting back in and installing the engine.
######################### On Engine Machine VM #############
This is pretty easy, just follow the prompts and make sure the passwords match those you setup on the host machine.
sudo yum localinstall -y http://ovirt.org/releases/ovirt-release.noarch.rpm
sudo yum localinstall -y http://ftp.osuosl.org/pub/fedora-epel/6/i386/epel-release-6-8.noarch.rpm
sudo yum install -y ovirt-engine screen

screen
sudo engine-setup
######################### On Host Machine #############
Once the engine installation is complete you confirm it on the host machine and it will restart the engine VM as a managed VM.
After this happens you are pretty much done, except I had some problems where the manager never unmounted the install CD from the engine VM. So I remove the file (you are done with it anyway) and it isn’t a problem. Also I don’t want to waste time installing VMs until after I reboot the host just in-case the engine doesn’t come back up.
rm /home/tmp/CentOS-6.5-x86_64-minimal.iso
reboot
Go to the https:///ovirt-engine/webadmin/ in your browser and start getting the datacenter setup. The oVirt documentation worked fine from here on out.
-Cheers!
